Installing DNA 1 of 2 - Cabling and Networking
Installing DNA 1 of 2 - Cabling and Networking
Let’s start with getting our DNA cabled up correctly. It’s more involved than you might think.
Before you get started
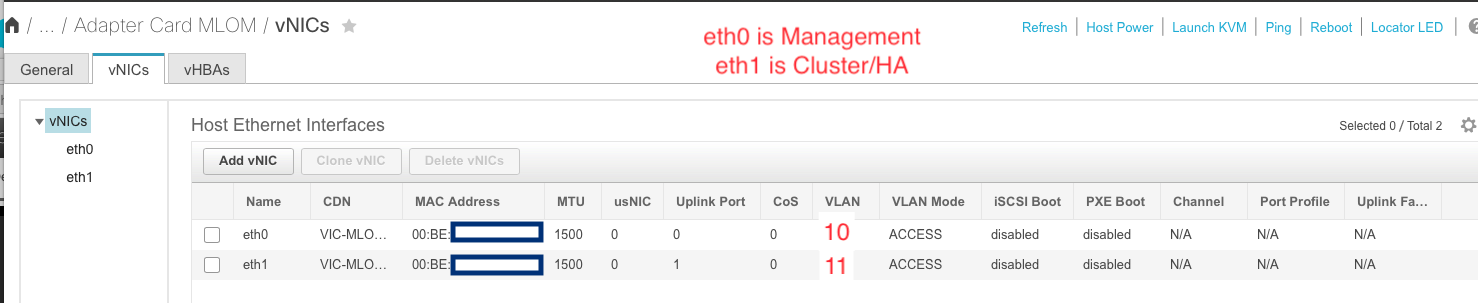
My DNA boxes shipped with the SFP+ ports in a trunk mode. But the installer will not let you assign a vlan ID. Maybe I was just a very early installer, but I had to change the ports to Access from within the CIMC Console. It’s also very helpful to gather mac addresses as you assign these vlans. My hardware was shipped before there was even a DNA Part number created… so yeah… it was not even beta to say the least.
UPDATE: this process is now documented well in the latest install Guide here.
A note on hardware support
Only DN1-HW-APL is supported. A VM or custom server is NOT supported by Cisco.
Cabling
You only need 2 NICs to get going. I have never tried it on 1GB. And make sure you order SFPs, they are not included in the DNA server bundle.
Here’s what you need to know.
| Linux Name | Installer Name | Speed | Purpose | Switch Mode | Required? |
|---|---|---|---|---|---|
| enp9s0 | Network Adapter #4 | 10GB SFP | Access/VIP/Server Network | trunk | Yes |
| enp10s0 | Network Adapter #1 | 10GB SFP | Intra Cluster Link | access | Only if you have more than 1 node |
| enp1s0f0 | Network Adapter #2 | 1GB RJ45 | OOB Application Mgmt | access | No |
| enp1s0f1 | Network Adapter #3 | 1GB RJ45 | Cloud Connectivity | access | No |
| CIMC Port | (not in installer) | 1GB RJ45 | OOB Chassis Mgmt | access | Yes |
Now let’s see the cables on the back of the chassis diagram

Cabling - Wiring Best Practices and Guidance
Cluster Link -
- Dedicate a L2 VLAN. No other hosts on this network.
- This is NOT the Cluster IP the installer asks for. I learned the hard way.
- You cannot ever…ever change this IP. Plan accordingly.
- It must not overlap with any part of the network that DNA will manage.
VIP/Server Network
- This is the IP you will access the GUI from.
- This is the subnet of Cluster IP (Virtual IP) the installer asks for.
- All Appliances must be on the same VLAN
- Ensure <10ms round trip over the intra-cluster link.
OOB Applicaton Management
- Optional.
- If you have a dedicated management network.
- It is not the CIMC Console NIC.
Cloud Connectivity
- Optional.
- If your server layer does not have internet access, you must use this (or the HTTPS Proxy) to get to the internet. DNA requires internet connectivity.
Installing DNA
You can install DNA from a USB stick, if you do, use Etcher.io to burn the ISO. Or you can also install from the CIMC KVM Console. Just mount the ISO and boot from it.
If something goes very wrong… and you need to reformat
If you need to format and restart. there’s 2 steps. Boot to the raid controller from BIOS - that’s CTRL-H on the RAID bootup screen I believe. Choose each Virtual Disks and then Press F2, and choose Fast Init. This will WIPE the disks. Then boot DNA media. Choose Manufacture DNA Appliance. This cool option will wipe the box and preload everything so when you boot up you get the nice screen from the factory about starting a DNAC Cluster.
This should cover what you need to know to cable, and prepare the networking for the appliance. Next up - Installing the Software.

Share this post
Twitter
Facebook
LinkedIn